Cubieboard不用显示器或电视,VNCinstall安装成功。有图有真相! | 少将全栈
  • 欢迎访问少将全栈,学会感恩,乐于付出,珍惜缘份,成就彼此、推荐使用最新版火狐浏览器和Chrome浏览器访问本网站。
  • 吐槽,投稿,删稿,交个朋友
  • 如果您觉得本站非常有看点,那么赶紧使用Ctrl+D 收藏少将全栈吧

Cubieboard不用显示器或电视,VNCinstall安装成功。有图有真相!

点滴 admin 11年前 (2013-12-22) 2441次浏览 已收录 扫描二维码

cubieboard制作ubuntu启动

cubieboard制作ubuntu启动

http://www.whatled.com/post-987.html
按照上面的步骤做完后,在板子插入TF卡,上电启动后,
http://linux-sunxi.org/Cubieboard/TTL
用TTL线在Linux下调试,
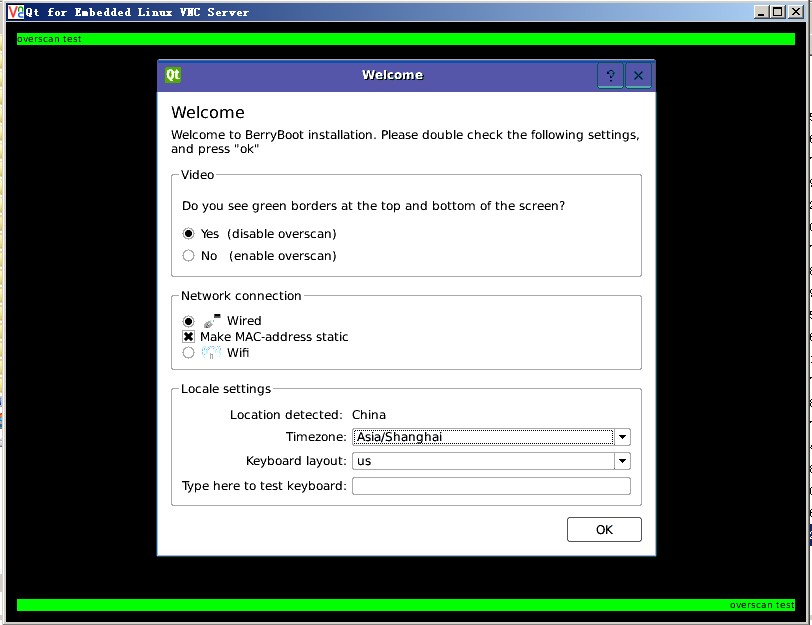
BerryBoot启动后,在屏幕下面会显示:
如果没有显示器,可以把vncinstall加入uEnv.txt和cmdline.txt中。

搜索一下,折腾了好几个方法,上了group.google.com,
berryboot论坛关于树莓派的帖子。
终于搞通了。
1.在TF卡根目录下的uEnv.txt文件,把bootargs=console=ttyS0
改为bootargs=console=ttyS0 vncinstall,
在google论坛找到的。
修改后,完整uEnv.txt文件是这样的:
mmcboot=fatload mmc 0 0x43000000 script.bin || fatload nand 0 0x43000000 script.bin || fatload nand 0 0x43000000 evb.bin; fatload mmc 0 0x48000000 kernel_a10_aufs.img; if fatload mmc 0 0x43100000 berryboot.img; then bootm 0x48000000 0x43100000; else bootm 0x48000000; fi
uenvcmd=run mmcboot
bootargs=console=ttyS0 vncinstall,115200 console=tty0 disp.screen0_output_mode=EDID:1280x720p60 hdmi.audio=EDID:0 bootmenutimeout=10 datadev=mmcblk0p2 mac_addr=56:76:6d:bb:b6:f8

2.在cmdline.txt,把vncinstall 加入所有文字的后面
vncinstall ipv4=192.168.1.110/255.255.255.0/192.168.1.1
即是vncinstall ipv4=板子IP/掩码/网关。(在berryboot论坛找到它的说明。)
你可以在路由器中看到开发板的IP,很奇怪IP,每次开机都会改变。
所以你要在路由器中监视它的IP。
修改后,文件内容如下:
smsc95xx.turbo_mode=N elevator=deadline quiet bootmenutimeout=10 vncinstall ipv4=192.168.1.110/255.255.255.0/192.168.1.1

3.开发板,连接网线–接上电源,
在TTL的监控窗口看内核运行情况。

4.打开一个VNC客户端,输入 192.168.1.110:0
192.168.1.110是开发板的IP,:0是VNC服务器的标识。
然后你就看会看到图像了。
如果是connection refuse,请检查你之前的设置,是否正确。
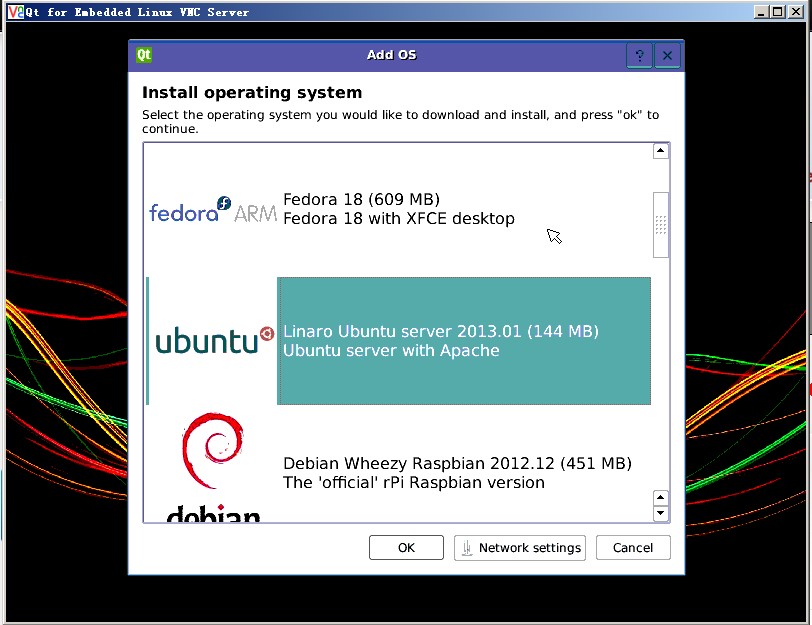
0-berryboot安装界面

选择系统:
4-系统列表

Server端:
我的Cubie上刷入的是lubuntu-desktop-12.xx_v1.05.img镜像下载地址:http://cubiebook.org/index.php?title=Firmware/A10-Cubieboard_Firmware%28NAND%29#lubuntu-desktop-12.10_v1.05
以下操作前提是你可以在本机终端或SSH连接到Cubie
sudo apt-get update
sudo apt-get install vim
我的Cubie局域网IP为:192.168.1.104
1.安装VNCServer
执行命令:
sudo apt-get install vnc-server
apt-get会给出一个提示,这个命令将会安装tightvnc在内的一系列包,输入Y继续安装
2.配置tightvncserver的启动服务
sudo vim /etc/init.d/tightvncserver
然后复制粘贴下面脚本到ssh窗口
### BEGIN INIT INFO
# Provides: tightvnc
# Required-Start: $remote_fs $syslog
# Required-Stop: $remote_fs $syslog
# Default-Start: 2 3 4 5
# Default-Stop: 0 1 6
# Short-Description: Start VNget=”_blank”>C Server as aservice
# Description: Start VNC Server as aservice.
### END INIT INFO
#!/bin/sh
# /etc/init.d/tightvncserver
# Customised by raspicndotcom
#http://www.penguintutor.com/linux/tightvnc
# Set the VNCUSER variable to the name ofthe user to start tightvncserver under
VNCUSER=’linaro’
eval cd ~$VNCUSER
case “$1” in
start)
su$VNCUSER -c ’/usr/bin/tightvncserver :1 -geometry 1024×640 -depth 16 -pixelformat rgb565’
echo “Starting TightVNC server for $VNCUSER ”
;;
stop)
pkill Xtightvnc
echo “Tightvncserver stopped”
;;
*)
echo “Usage: /etc/init.d/tightvncserver {start|stop}”
exit 1
;;
esac
exit 0
#
需要特别说明的一点是这个脚本的默认用户是“linaro”
sudo chmod 755 /etc/init.d/tightvncserver
sudo update-rc.d tightvncserver defaults
3.VNCServer设置
在默认账户linaro下输入命令
vncserver :1
会提示你设定vnc 服务的访问密码
需要连续输入两次密码
密码长度最好为8
之后还会提示你要不要输入一个只读密码
只读密码可以选Y输入也可以选n跳过
vncserver -kill :1
编辑~/.vnc/xstartup
x-window-manager改为startlubuntu
配置完毕
输入命令
sudo reboot
重新启动后就可以用刚才设定的密码登录VNC 服务器
PS:Xfce桌面配置
安装xfce桌面
apt-get install xfce4
编辑~/.vnc/xstartup
xsession-manger改为
startxfce4
Client端:
下载Real VNC
http://www.realvnc.com/download/
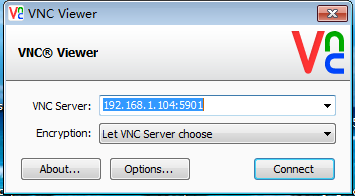
启动VNC Viewer

Cubieboard不用显示器或电视,VNCinstall安装成功。有图有真相!

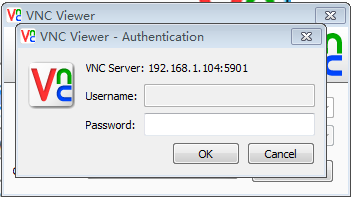
输入上面启动VNCServer时设置的密码

Cubieboard不用显示器或电视,VNCinstall安装成功。有图有真相!

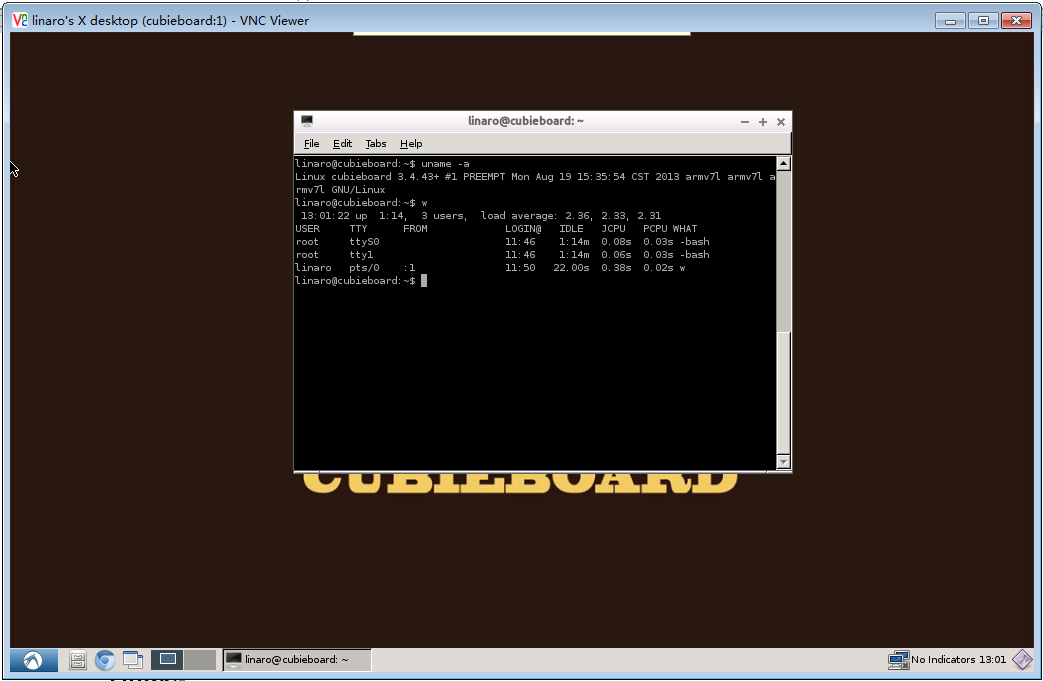
下面是成功登录的界面。

Cubieboard不用显示器或电视,VNCinstall安装成功。有图有真相!

SSH+VNC实现安全的Linux远程桌面管理
Linux:
创建服务器5901端口和本地5901端口的加密隧道。
ssh ?L 本地端口:本地地址:远端端口远端地址
ssh -L 5901:X.Y.Z.W:5901 A.B.C.D
vncviewer A.B.C.D:1
这样打开的VNC窗口所有数据都经过了SSH的加密
Windows:
下载SSH Secure Shell
http://www.onlinedown.net/soft/20089.htm
下载Real VNC
http://www.realvnc.com/download/
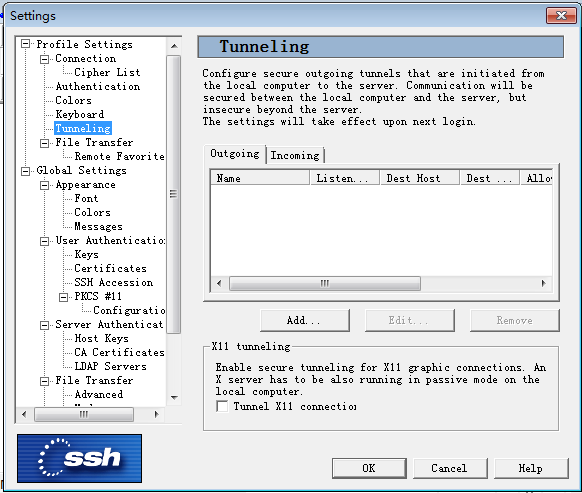
首先,在SSH Secure Shell的主界面上选择Settings下的Tunneling,如下图。

Cubieboard不用显示器或电视,VNCinstall安装成功。有图有真相!

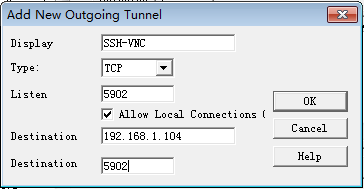
选择添加一个配置,如下图,其中Listen是本机端口,Destination是远程地址和端口,Display可以设定自己的描述

Cubieboard不用显示器或电视,VNCinstall安装成功。有图有真相!

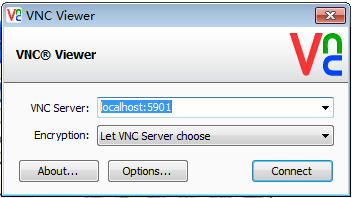
最后,再运行vncviewer来链接即可。特别值得注意的是:此处Server的地址不是需要连接的VNC Server的地址,而是前面设定的本机的SSH侦听端口的地址,因为所有通往VNC Server的流量都需要先经过本机的SSH进行转发,如下图,一般设定为localhost加端口即可,该端口就是在上图中设定的SSH的侦听端口。
Cubieboard不用显示器或电视,VNCinstall安装成功。有图有真相!
参考:
树莓派上手实战之SSH下配置VNC服务器实现远程桌面
http://www.raspicn.com/thread-50-1-2.html
使用SSH+VNC实现安全的Linux远程桌面管理

http://book.51cto.com/art/201110/297750.htm


关于开机启动的配置

如果在 /etc/init.d 中加入一个script,还须要制作相关的link
在 /etc/rc*.d 中。K 开头是kill,S 开头是start,数字顺序代表启动的顺。
update-rc.d 可以帮你的忙。

例:
在 /etc/init.d 中建立一个叫作zope 的script , 然后
update-rc.d zope defaults
就会产生以下链?:
Adding system startup for /etc/init.d/zope …
/etc/rc0.d/K20zope – ../init.d/zope
/etc/rc1.d/K20zope – ../init.d/zope
/etc/rc6.d/K20zope – ../init.d/zope
/etc/rc2.d/S20zope – ../init.d/zope
/etc/rc3.d/S20zope – ../init.d/zope
/etc/rc4.d/S20zope – ../init.d/zope
/etc/rc5.d/S20zope – ../init.d/zope

上面的设置适用于所有程序,下面就vnc来谈

在 /etc/init.d 目录下谢一个脚本vnc.sh,内容如下:
#!/bin/bash
#svnserve startup
vncserve -d

然后执行:
update-rc.d vnc.sh defaults

只需两步就可以让vnc在系统启动时启动

查看开机启动配置:

chkconfig –list

chkconfig –add xxx

chkconfig –del xxx
喜欢 (0)
[🍬谢谢你请我吃糖果🍬🍬~]
分享 (0)
关于作者:
少将,关注Web全栈开发、项目管理,持续不断的学习、努力成为一个更棒的开发,做最好的自己,让世界因你不同。