毕业设计就选的点阵,对点阵还是算比较熟悉的,再复习下。
概述
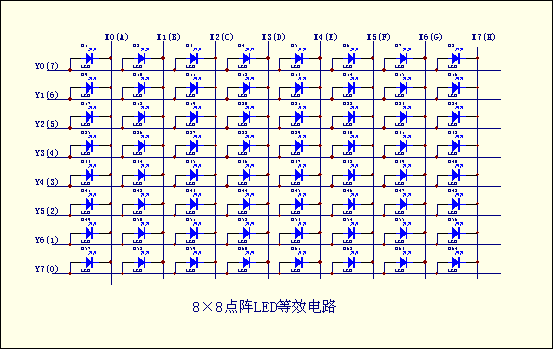
1.8*8点阵原理图
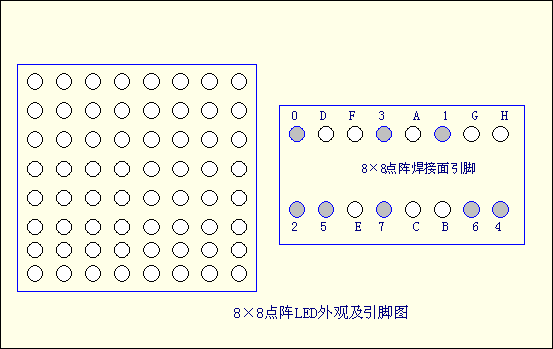
2. 8*8点阵实物图
图为8×8点阵LED外观及引脚图,其等效电路如图(2)所示,只要其对应的X、Y轴顺向偏压,即可使LED发亮。例如如果想使左上角LED点亮,则Y0=1,X0=0即可。应用时限流电阻可以放在X轴或Y轴
3. 8*8点阵扫描方式
LED一般采用扫描式显示,实际运用分为三种方式
(1)点扫描
(2)行列扫描
16×64=1024Hz,周期小于1ms即可。若使用第二和第三种方式,则频率必须大于16×8=128Hz,周期小于7.8ms即可符合视觉暂留要求。此外一次驱动一列或一行(8颗LED)时需外加驱动电路提高电流,否则LED亮度会不足。
3. 8*8点阵应用举例
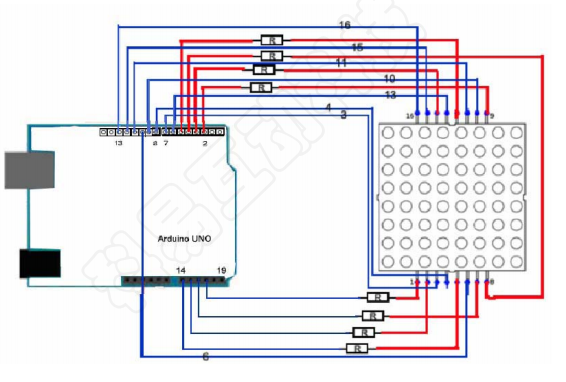
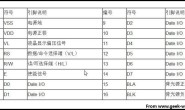
点阵内部结构及外形如下,8X8点阵共由64个发光二极管组成,且每个发光二极管是放置在行线和列线的交叉点上,当对应的某一行置1电平,某一列置0电平,则相应的二极管就亮;如要将第一个点点亮,则9脚接高电平13脚接低电平,则第一个点就亮了;如果要将第一行点亮,则第9脚要接高电平,而(13、3、4、10、6、11、15、16)这些引脚接低电平,那么第一行就会点亮;如要将第一列点亮,则第13脚接低电平,而(9、14、8、12、1、7、2、5)接高电平,那么第一列就会点亮。
一般我们使用点阵显示汉字是用的16*16的点阵宋体字库,所谓16*16,是每一个汉字在纵、横各16点的区域内显示的。也就是说得用四个8*8点阵组合成一个16*16的点阵。如下图所示,要显示“你”则相应的点就要点亮,由于我们的点阵在列线上是低电平有效,而在行线上是高电平有效,所以要显示“你”字的话,它的位代码信息要取反,即所有列(13~16脚)送(1111011101111111,0xF7,0x7F),而第一行(9脚)送1信号,然后第一行送0。再送第二行要显示的数据(13~16脚)送(1111011101111111,0xF7,0x7F),而第二行(14脚)送1信号。依此类推,只要每行数据显示时间间隔够短,利用人眼的视觉暂停作用,这样送16次数据扫描完16行后就会看到一个“你”字;第二种送数据的方法是字模信号送到行线上再扫描列线也是同样的道理。同样以“你”字来说明,16行(9、14、8、12、1、7、2、5)上送(0000000000000000,0x00,0x00)而第一列(13脚)送、“0”。同理扫描第二列。当行线上送了16次数据而列线扫描了16次后一个“你”字也就显示出来了。
|
|
|
|
|
|
|
|
|
|
|
|
|
● |
● |
● |
|
|
|
|
|
● |
|
|
|
● |
|
|
|
|
● |
|
|
|
● |
|
|
|
|
● |
|
|
|
● |
|
|
|
|
● |
|
|
|
● |
|
|
|
|
● |
|
|
|
● |
|
|
|
|
|
● |
● |
● |
|
|
因此,形成的列代码为 00H,00H,3EH,41H,41H,3EH,00H,00H;只要把这些代码分别依次送到相应的列线上面,即可实现“0”的数字显示。
本实验的连线图。
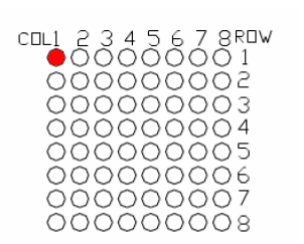
点亮8X8点阵LED的一个LED如下:
*******************************************************************************
实例代码:
//the pin to control ROW

const int row1 = 2; // the number of the row pin 9

const int row2 = 3; // the number of the row pin 14

const int row3 = 4; // the number of the row pin 8

const int row4 = 5; // the number of the row pin 12

const int row5 = 17; // the number of the row pin 1

const int row6 = 16; // the number of the row pin 7

const int row7 = 15; // the number of the row pin 2

const int row8 = 14; // the number of the row pin 5

//the pin to control COl

const int col1 = 6; // the number of the col pin 13

const int col2 = 7; // the number of the col pin 3

const int col3 = 8; // the number of the col pin 4

const int col4 = 9; // the number of the col pin 10

const int col5 = 10; // the number of the col pin 6

const int col6 = 11; // the number of the col pin 11

const int col7 = 12; // the number of the col pin 15

const int col8 = 13; // the number of the col pin 16

void setup() {

  int i = 0 ;

  for (i = 2; i < 18; i++)

  {

    pinMode(i, OUTPUT);

  }

  pinMode(row5, OUTPUT);

  pinMode(row6, OUTPUT);

  pinMode(row7, OUTPUT);

  pinMode(row8, OUTPUT);

  for (i = 2; i < 18; i++) {

    digitalWrite(i, LOW);

  }

  digitalWrite(row5, LOW);

  digitalWrite(row6, LOW);

  digitalWrite(row7, LOW);

  digitalWrite(row8, LOW);

}

void loop() {

  int i;

  //the row # 1 and col # 1 of the LEDs turn on

  digitalWrite(row1, HIGH);

  digitalWrite(row2, LOW);

  digitalWrite(row3, LOW);

  digitalWrite(row4, LOW);

  digitalWrite(row5, LOW);

  digitalWrite(row6, LOW);

  digitalWrite(row7, LOW);

  digitalWrite(row8, LOW);

  digitalWrite(col1, LOW);

  digitalWrite(col2, HIGH);

  digitalWrite(col3, HIGH);

  digitalWrite(col4, HIGH);

  digitalWrite(col5, HIGH);

  digitalWrite(col6, HIGH);

  digitalWrite(col7, HIGH);

  digitalWrite(col8, HIGH);

  delay(1000);

  //turn off all

  for (i = 2; i < 18; i++) {

    digitalWrite(i, LOW);

  }

  delay(1000);

}
***********************************************************************
另外的实验代码如下:
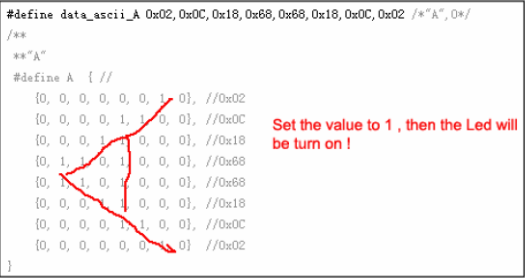
显示A这个字母, 则在点阵中的位置 置1. 通过动态扫描显示 。
代码:
***********************************************************************************
#define display_array_size 8

// ascii 8x8 dot font

#define data_null 0x00, 0x00, 0x00, 0x00, 0x00, 0x00, 0x00, 0x00 // null char

#define data_ascii_A 0x02,0x0C,0x18,0x68,0x68,0x18,0x0C,0x02 /*"A",0*/

/**

 **"A"

 #define A  { //

    {0, 0, 0, 0, 0, 0, 1, 0}, //0x02

    {0, 0, 0, 0, 1, 1, 0, 0}, //0x0C

    {0, 0, 0, 1, 1, 0, 0, 0}, //0x18

    {0, 1, 1, 0, 1, 0, 0, 0}, //0x68

    {0, 1, 1, 0, 1, 0, 0, 0}, //0x68

    {0, 0, 0, 1, 1, 0, 0, 0}, //0x18

    {0, 0, 0, 0, 1, 1, 0, 0}, //0x0C

    {0, 0, 0, 0, 0, 0, 1, 0}  //0x02

}

**/

#define data_ascii_B 0x00,0x7E,0x52,0x52,0x52,0x52,0x2C,0x00 /*"B",1*/

#define data_ascii_C 0x00,0x3C,0x66,0x42,0x42,0x42,0x2C,0x00 /*"C",2*/

#define data_ascii_D 0x00,0x7E,0x42,0x42,0x42,0x66,0x3C,0x00 /*"D",3*/

#define data_ascii_E 0x00,0x7E,0x52,0x52,0x52,0x52,0x52,0x42 /*"E",4*/

#define data_ascii_F 0x00,0x7E,0x50,0x50,0x50,0x50,0x50,0x40 /*"F",5*/

#define data_ascii_G 0x00,0x3C,0x66,0x42,0x42,0x52,0x16,0x1E /*"G",6*/

#define data_ascii_H 0x00,0x7E,0x10,0x10,0x10,0x10,0x7E,0x00 /*"H",7*/

#define data_ascii_I 0x00,0x00,0x00,0x7E,0x00,0x00,0x00,0x00 /*"I",8*/

// display array

byte data_ascii[][display_array_size] = {

  data_null,

  data_ascii_A, data_ascii_B,

  data_ascii_C,

  data_ascii_D,

  data_ascii_E,

  data_ascii_F,

  data_ascii_G,

  data_ascii_H,

  data_ascii_I,

};

//the pin to control ROW

const int row1 = 2; // the number of the row pin 24

const int row2 = 3; // the number of the row pin 23

const int row3 = 4; // the number of the row pin 22

const int row4 = 5; // the number of the row pin 21

const int row5 = 17; // the number of the row pin 4

const int row6 = 16; // the number of the row pin 3

const int row7 = 15; // the number of the row pin 2

const int row8 = 14; // the number of the row pin 1

//the pin to control COl

const int col1 = 6; // the number of the col pin 20

const int col2 = 7; // the number of the col pin 19

const int col3 = 8; // the number of the col pin 18

const int col4 = 9; // the number of the col pin 17

const int col5 = 10; // the number of the col pin 16

const int col6 = 11; // the number of the col pin 15

const int col7 = 12; // the number of the col pin 14

const int col8 = 13; // the number of the col pin 13


void displayNum(byte rowNum, int colNum)

{

  int j;

  byte temp = rowNum;

  for (j = 2; j < 6; j++)

  {

    digitalWrite(j, LOW);

  }

  digitalWrite(row5, LOW);

  digitalWrite(row6, LOW);

  digitalWrite(row7, LOW);

  digitalWrite(row8, LOW);

  for (j = 6; j < 14; j++)

  {

    digitalWrite(j, HIGH);
  }

  switch (colNum)

  {

    case 1: digitalWrite(col1, LOW); break;

    case 2: digitalWrite(col2, LOW); break;

    case 3: digitalWrite(col3, LOW); break;

    case 4: digitalWrite(col4, LOW); break;

    case 5: digitalWrite(col5, LOW); break;

    case 6: digitalWrite(col6, LOW); break;

    case 7: digitalWrite(col7, LOW); break;

    case 8: digitalWrite(col8, LOW); break;

    default: break;

  }

  for (j = 1 ; j < 9; j++)

  {

    temp = (0x80) & (temp) ;

    if (temp == 0)

    {

      temp = rowNum << j;

      continue;

    }

    switch (j)

    {

      case 1: digitalWrite(row1, HIGH); break;

      case 2: digitalWrite(row2, HIGH); break;

      case 3: digitalWrite(row3, HIGH); break;

      case 4: digitalWrite(row4, HIGH); break;

      case 5: digitalWrite(row5, HIGH); break;

      case 6: digitalWrite(row6, HIGH); break;

      case 7: digitalWrite(row7, HIGH); break;

      case 8: digitalWrite(row8, HIGH); break;

      default: break;

    }

    temp = rowNum << j;

  }

}


void setup() {

  int i = 0 ;

  for (i = 2; i < 18; i++)

  {

    pinMode(i, OUTPUT);

  }


  for (i = 2; i < 18; i++) {

    digitalWrite(i, LOW);

  }

}

void loop() {

  int t1;

  int l;

  int arrage;

  for (arrage = 0; arrage < 10; arrage++)

  {

    for (l = 0; l < 512; l++)

    {

      for (t1 = 0; t1 < 8; t1++)

      {

        displayNum(data_ascii[arrage][t1], (t1 + 1));

      }

    }

  }

}
